

Step by Step – How to Make Your Own Pocket Survival Kit
In this post, I will show you how I make my pocket survival kits and what’s packed inside. At first, I wanted to buy a kit online but after searching, I couldn’t find a suitable match for me. Every kit had some sort of compromise you had to accept, such as a larger case or no heat blanket.
Pocket Survival Theory
The underlying theory of the pocket survival kit (PSK), is that it has to fit in your PANTS pocket. Not in your jacket, neither is it strapped to your waist or backpack or so big that it fills your pocket entirely. It has to be perfectly sized, so that you don’t even notice you’re carrying a survival kit.
As a result, you will be less inclined to take it out of your pocket and store it elsewhere. Any pocket survival kit, that uncomfortably rubs on your leg or rattles with its contents, will soon be removed on a long walk! In my opinion, to achieve these results, then you need to make your own pocket survival kit.
Learn with Every PSK you Make
I was pretty happy with my first PSK build, until I was showing the kit to a friend one afternoon. He raised some uncomfortable questions about its contents and he was right. There were items NOT in there, that should be and items that shouldn’t be in there at all.
I now review my pocket survival kit every year and more importantly, I review the most probable survival situation that I might face. If we plan to go camping in the coming months, in certain terrain, then I will alter the contents of the kit to suit.
The Purchase of the Pocket Survival Kit
When I built my first PSK, I used some gear I already had and I purchased more at army surplus outlets. With my later version, I reused some of that gear and bought some newer stuff on Amazon. A couple of items, I even re engineered for a new purpose, just so I could get everything I wanted to fit.
Whichever way you go about it, you will need to find gear that will suit the pocket sized container. For this post, I will provide Amazon links to products, that are similar to mine and just so you can browse the options yourself. You will need to find solutions, to get all your gear and more to fit inside such a small space.
Of course, Amazon will pay a commission if you buy through these links but check out the product information they provide, as it is extensive. Amazon will also provide related products to help you see what is really available, I find this all very useful when I’m making a purchase. Especially, when trying to determine the available packing space of the online cases/containers or even their overall size.
Pre Made Pocket Survival Kits
Another option is to buy an existing pre made kit and modify it to better suit your needs. I have other posts comparing these kits to my PSK build and so far, my home build is a far superior pocket survival kit. You can save a fair amount of time if you go this way but you will need to add some gear to these online kits.
Step #1 – Start with The Container
Every little thing is magnified when you are under duress, to the point that little rubbing or rattling can be blown out of all proportion. For this reason, you need to start with finding the perfect sized container for your kit. I’II will give you a few of the expert’s tips here:
- Fits in your PANTS pocket
- Hard case and waterproof seal and eyelet for fastening cord
- Firm clasp or locking mechanism
- Adequate size to fit, at a minimum, a Heat Blanket plus other items
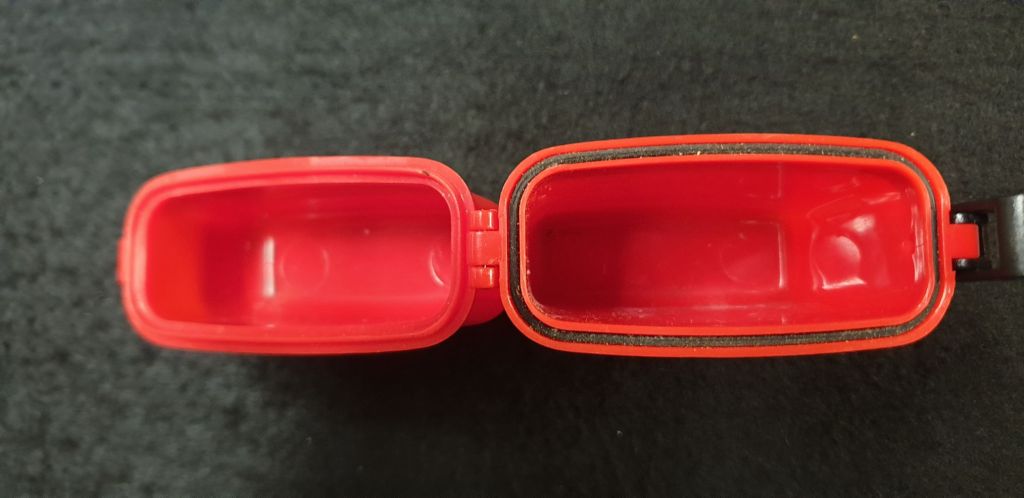
When choosing your container, look for a balance between the ultimate comfort in your pocket and just how much stuff you can squeeze in. Follow the steps above, when selecting your container and see the photos of my case below.

- It has a clasp which pulls down on the lid to close it tight to the rubber seal inside the lip of the container
- An eyelet to tie on a piece of Para cord
- The container material is a hard plastic
- I confirmed before purchase that a Heat blanket can fit
Work Out How Much Space You Have
For example, my case specs: 110mm long x 70mm wide (95mm inc hinge and clasp) x 35mm thick at join (30mm in general) Internally, the bottom section has 65mmm of depth and about 27mm of width, the lid has approx. 40mm of depth and the same 27mm width as the base.
I used Amazon to determine the packing space, that this case would provide and then checked the size of my bulkiest items. Once I was confident that I could get all my gear to fit, I made my purchases and started the build.
Pocket Survival Kit Contents
Where you are heading and the prevailing conditions of that location will determine the make up of your contents. Not so much the main unchangeable items but the amount of each one may differ, such as:
- More water collection for dry environs
- Insect repellent for tropical areas, dry tinder
- Food may be hard to come by, so additional long-lasting rations may be required
- Or for more personal reasons: Space for specific medicinal needs like Insulin
This is where my spreadsheet determined the most useful items, that I would want to have on me in a dire situation. My PSK is set up as a bit of an all-rounder and with redundancies for the most needed items packed in.
Here is the inventory of my PSK:
| Fishing tackle | Cable ties |
| Scalpel Blade | Tape |
| Filtered Straw | Splinter Pick |
| Water purification tablets | Tweezers |
| Safety matches and striker | Zip Lock Bag |
| Rescue whistle | Elastic Bands |
| Button compass | Snare wire |
| Tinder | Signal mirror |
| Fire starting device | Sewing Needle and small amount of cotton thread |
| Heat Blanket | Cord |
| Fishing line | Compression Bandage |
| Band Aid | Glow Stick lures |
| Salt tablets/Electrolytes | Tie Wire |
And the Spreadsheet here:
A little bit smaller than mine but close enough.
Personal Choice
If this case type is not to your liking, you can look at the growing range of waterproof cell phone cases. They are a good pocket size. A cell case will give you a bit more space to pack everything in, if the smaller cases are too challenging. But I stress, the smaller the case, the better the pocket kit it makes.
Step #2 – Start with the Bulky items

#1 Survival Item – The Heat Blanket
You can see the heat blanket folded up inside, it’s a 2.1m x 1.3m (52” x 82.5”). The blanket was folded and had the air squeezed out with each fold, to get it in there. Some kits, even though they are far larger than mine, don’t include a full-sized Heat Blanket, which is unacceptable.
Checkout the spreadsheet to see the blanket scored a whopping 23 pts, more valuable than fire-starting gear and your knife. The FULL-sized blanket is a must and is the first item to go in.
The Blanket can be compressed even further. So, I slipped down either side of the blanket: water purification tablets for 50 litres of treatment. (50 tablets good for 1 lt each). As well as a match striking paper strip and I also cut down a signal mirror to fit the inside perfectly. It slipped right down alongside the purification tablets.
Don’t just think about a regular heat blanket, these poncho blankets are a great example of survival fitness.
Pack Around the Bulky Items
Once you have your largest items in the case, take advantage of the small spaces around the bulky items. Often there will be unused space for certain shaped items to fit into, you must utilize all these spaces. Keep in mind, that the tighter you pack the kit, then the less chance of the dreaded rattling of contents.
As a result of the Heat blankets shape; any flat, thin object you have, now’s the time for it to go in. Scalpel blades, Band-Aids, paper, golf card pencil, magnifying lens, rescue ribbons – flat and thin goes in, now.
Purified in 35 minutes. Make sure you go for tablets already packed to suit your kit. Not like the bottle shape on the left, find the individually wrapped and thin packets like on the right image. Be sure you follow their instructions for use and storage, to safely get the best results.
Build in Some Personal Customization Space
Note the space next to the packed blanket. This is actually spare and should be used to customize your kit to suit any exceptional circumstances you may face. Such as the provision of vital medication.
I chose to fill it up with a filtered drinking straw that I made. You can never have enough ways to gather and purify water, it is the highest priority for the survivor.
The Filtered Straw

I am still testing this device but so far it has been impressive. You can improvise the filter medium and it gives more options for extracting water from hard to reach places. The Aluminium filter, is actually an in-line fuel filter for petrol powered RC cars. It seems to filter out a lot of the particles in the water but no effect on any chemicals/germs that may be in the water though.
You should boil any water you intend to drink if you are unsure it’s safe and even if you are sure. Test everything in tiny doses, rub some on your skin, touch it to your lips and just the tip of your tongue. You should do this before taking on a larger dose and wait awhile between test doses, to monitor for any adverse symptoms. Reject anything, including water, that creates a burning, numbing or stinging feeling to your skin/lips.
Keep in mind that filtered water is very different from purified water – Boiling any water you intend to drink is still best practice for the survivor. However, you will die of thirst before any of the germs in the water will make you ill. As a survivor, you will need to weigh up that decision carefully.
Don’t Waste Any Space!

There is about 600mm of tube. Which in itself is mostly made up of empty space. FILL IT – if you want fitness built in to your survival kit. I used a 2 mm Aluminium Bonsai wire and threaded it through the straw. It actually helps keep the tight shape you need to make, to get it in the kit!


Now you have a filtered drinking straw and a half meter of tie wire to help with your camp craft. A heat blanket, 50 lts of water purification and a signalling ability with the mirror, so far so good!
The size of these two straws, will mean they can only fit inside your 72 hour survival kit or your Bug out Bag. Your going to have to engineer one to fit in your pocket survival kit…can you do it?
Step #3 – Packing the Lid
There is still plenty of room inside the lid. It would be easy to throw in a couple of bobbins of fishing line and wire with room to spare. Some kits offer a couple of meters of each, which I guess will get you out a bind. If you want more than that, like I did, improvisation and engineering is now required.

These are waterproof matches, inside a waterproof match container, which is then sealed inside your waterproof case. you will have dry matches as a last resort. And you will be thankful you do! However, that is too many matches. They are only a back up in case your main fire lighting device has failed you. So, 5-6 should be ok. (unless the weather conditions dictate you to carry more)
Now, I have a pretty well stocked workshop, complete with tools and screws and other bespoke parts and pieces. Which makes it easy for me to create solutions for some of these space problems, no so for others. If you don’t have the capabilities to engineer solutions like I did. Then you will need to use your creativity in the selection of suitable pre made equipment.
Which is totally doable, you may not get the maximum quantities this way though. Whatever your choice in the end, you can use up as much space as my solution did.
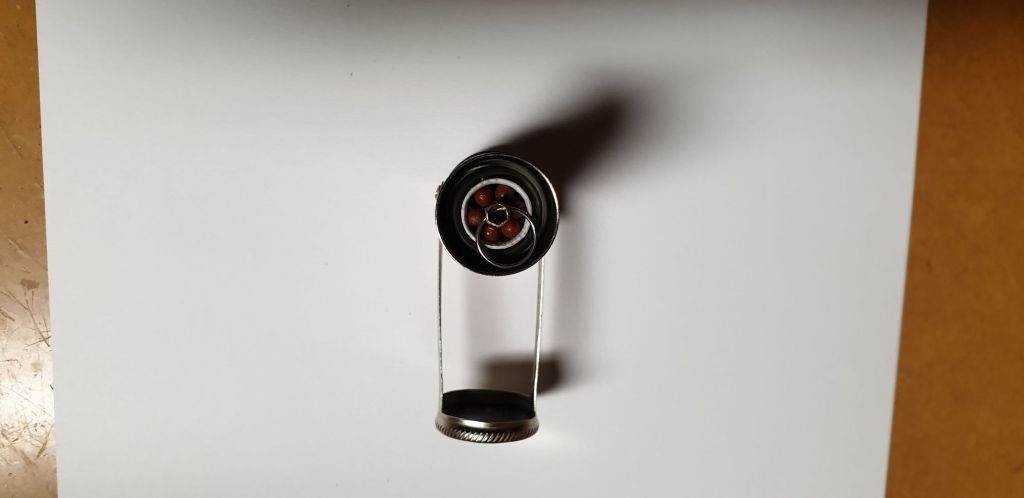
Fishing, Trapping, Fire – All in One Tube
Waterproof match container dimensions – 65 mm long x 22 mm in diameter and purchased from an Army surplus outlet.

I used a small plastic tube with a bolt head glued on as a base and wound on 25 meters of high strength fishing line and 10 meters of snare wire. (you could get even more with a thinner Brass wire)
Snare Wire

There’s some great products out there for snare wires or just use what you have around the home like I did.
If you’re going to pack snare wire then you need to educate yourself some. As trapping isn’t easy to do, so, in a survival situation don’t expect success straight away. Also, practicing trapping techniques is difficult, without needlessly killing wildlife. So, read up and test your traps with a mock weight, to simulate your prey.
Fishing line


Spare Matches and Flint


And when it’s all put together:

Maximum use of space = Survival Fitness


I made this little fishing/snare/matches kit only as an example of the lengths you can go to. I don’t expect anyone to make something similar and you can certainly still pack this gear without the tube. However, to fit meaningful amounts of your essential gear, then you will need to take extra steps with packing.
Contents Update
I have a filtered drinking straw and a half a meter of tie wire to help with your camp craft. A heat blanket, 50 lts of water purification and a signalling ability with the mirror. Trapping and fishing equipment (hooks and lures stored under the tube, see below photo) Emergency fire and spare primary fire starter, a couple of O rings and a metal key ring. And it still leaves half of the lid space available!

You can see the glow stick lures, you may be able to store needles, fish hooks and split shot here. Fill the voids all around and under the waterproof tube’s circular shape. Be sure to include some foam to prevent the dreaded RATTLE, which is the death of any PSK. It is also probably the best spot to slip in some packets of Salt or electrolyte tablets. An incredibly important mineral for our bodily functions, must have Salt.
Fire!

My primary fire starter of choice is the flint and rope or Trench lighter, which I now place on top of the match stick tube in the lid. I have already packed in the secondary source of fire and spare flints for the primary source:

Plenty of tinder for starting a fire. Lots of flint storage built in too, wrapped up below for packing in the PSK. Matchbox for comparison only:

4 x 4’’ cable ties, splinter remover, tweezers (Swiss Army Knife type). Silica Gel packet added to the right side. 2 x glow stick fishing lures and the Primary fire starter added to left side. Complete with 2 x elastic bands, salt packets under the match stick tube.
So far, the PSK has contents (with back up for the most needed) that will cover these following vital areas:
- Water purification/Salt
- Fire Lighting
- Shelter making, exposure protection
- Food gathering
- Signaling for rescue
- Minor medical equipment
More Water Options
Which leaves Navigation and Medical provision for the remaining ¼ of the lid space. Next to the flint and rope there is more than enough room for a button compass and a tube of medical supplies, pills or band-aid, butterfly dressings etc.
I have chosen not to include any medical provisions for this pack. Instead, I have inserted a medium sized zip lock bag. This will increase my chances of collecting and retaining water, storing food or even starting a fire.


Step #4 – The Final Squeeze

Plenty of space for Pre rigged fish hooks, split shot (in plastic tube – fight the rattle!) Likewise, for the needle and thread, the point covered to prevent puncturing vital goods.
Zip lock bag is now packed in next to the compass and right next to the bag wrapped in silver tape is a pre rigged night line for fishing. Sinkers, lures and needles tucked underneath it all.

Navigation and Whistle


You will need to sacrifice some essential survival items to squeeze a piece like this whistle into your PSK. Or, you can just wear it around your neck at all times. I can whistle quite sharply with just my lips and tongue, some can do it with their fingers and lips. And if you’re like my wife, you cannot whistle to save yourself!
Everyone will approach the need for the whistle as being an essential inclusion, based on their own abilities to whistle. However, you have to include the possibility that you may have received a mouth/jaw injury. Or, even chest/lung problems and then the need of a whistle makes more sense.
You would definitely have the above whistle type in your 72 hour kit and even in the Bug out Bag. Make sure that the whistle is easily accessible, as you may need to attract the attention of rescuers without delay.
Whistle Options
The rescue whistle also scored a 10 on the spreadsheet, demanding that we pay attention to its essential survival benefits. At this point, I wasn’t too keen on sacrificing anything I had already put in my PSK.
However, I could remove the straw and replace it with a suitable sized combo whistle. Again, sacrificing a source of water gathering for a whistle might seem to be a stupid decision. And especially when in an actual survival situation and in need of a straw to drink!
My solution was to look to re-engineering a whistle. I found one that was already available in a compact size, to suit my kit without the sacrifice. It also came with a button compass, which solved my navigation needs as well.
Here’s what I found:

That’s not a knife! But it is an awesome button compass with a TINY rescue whistle on the right next to the compass!
This piece I found cheaply here: IPRee® 4 In 1 EDC Survival Bracelet Outdoor Emergency 7 Core Paracord Whistle Compass Kit

There are more expensive and similar items available, I found some more below with additional mini features.
Ferro rod and other useful bits
This one covers a few bases!
Good compass and whistle
I like this whistle better than mine, it will be easier to cut down for beginners too.

I like this mini compass and its going on my list to buy: Survival Titanium Outdoor Compass Wrisband Bracelet Camping Adventure Climing Brace
Making a Whistle
Before you do anything you should consider the next images of me slicing the bracelet into pieces. Got to make it fit! I also removed the Paracord and used it for a lanyard to attach to the PSK. The small knife can be utilized if you wish, better to rely on the one or two STRAPPED to your belt.


Button compass popped right out (as hoped). Confirm its construction and accuracy before committing it to your PSK, this compass will do the trick:


A mini whistle and mini compass, toss the rest away!

Mini rescue whistle threaded onto the PSK lanyard, easily accessible and loud too!

But wait, there’s more space.

Common sizes of other PSK’s for sale. Smallest is the common Altoids tin kit size, the biggest is also 2 inches thick! Pocket sized??
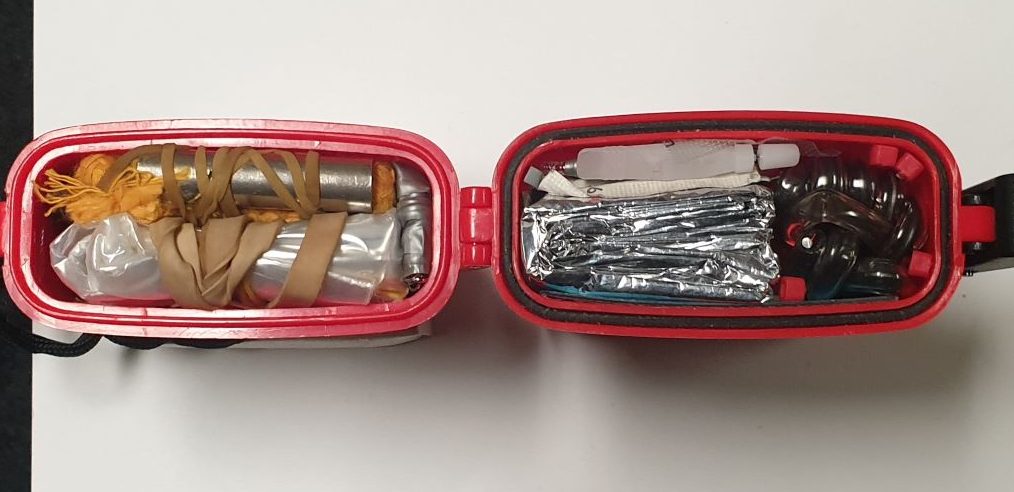
Final Contents
Here is the list again of the typical internet contents. I have made comments next to each item regarding the decision-making process behind their inclusion/exclusion from the kit.
Contents included in Pocket Survival Kit Build:
- Sewing Needle and small amount of cotton thread, plenty of room to slip in the large eyed “Darning” needles
- Ties or Cord – 600mm of paracord, tied to the external lanyard hole
- Signal mirror – cut to suit your kit size
- Heat Blanket – full size over 2 meters
- Fire starting devices – with back up
- Tinder – Flint and rope
- Button compass – check accuracy before use
- Rescue Whistle – attached to the lanyard where it can be accessed quickly
- Safety Matches – secondary fire source x 6 and strike paper strip
- Water purification tablets – 50 litres worth
- Fishing gear – 2 x pre rigged hooks, 1 x pre rigged night line with 2 hooks and spinners, 25 meters of high strength line, 6 split shot sinkers, 4 glow stick lures
- Snare wire – 10 meters of 0.8-gauge s/steel wire, 500mm of 2.0mm Aluminium tie wire
- Elastic Band – x 4
- Filtered Straw – 500mm long
- Zip Lock Bag – medium sized, easily holds a litre of water. Magnify the Sun through the water filled Zip lock bag to start a fire!
- Tweezers – Swiss army type
- Splinter Pick – not really required if you have sewing needles better to pack more fire lighting or water gathering equipment instead
- Salt/Electrolytes – Tablets or a packet of salt are a MUST include item
Must Have Salt
You can buy tablets or just pack a little bag of picnic salt! I like the tablets but you have options available to suit your kit and the space you have left. Make sure one or the other goes in your kit.
Food Options:
- Fishing Tackle – It is unlikely that the survivor will have a lot of time for fishing, with all their other immediate needs, such as water and fire/shelter. My kit includes enough gear and of the type that the survivor can set and leave while doing other tasks. A night line is even better if left overnight and have fish for Breakfast! And longer term survivors, would be best to expend energy in damming or diverting the river to trap the fish. Much less effort overall and more success is likely this way. Keep in mind, that floats, sinkers and other tackle can be easily improvised from nature.
- Snare Wire – A generous amount included as it is best to set up a number of snares to max your chances of a meal. *Snares can be quite painful for the victim* Ensure you monitor your traps at all times and only catch what you can eat! Wounded animals can attract other predators who may wish to argue with you over ownership of the meal, pick your fights wisely.
- Duct/Sticky Tape – Great to have. But not at the expense of the essential items, engineer a solution to have it all without sacrifice!
- Scalpel Blade – Really essential if you have no knife, takes up little room, slip one in somewhere
Contents Not Included:
- Money – can’t eat money
- Knife – On your belt – ALWAYS, any knife inside your PSK not worth it,
- Can Opener – I’m beginning to wonder if you need rescuing! My kit assumes that I have no access to canned foods, improvise or use one of your many knives/multitools STRAPPED to your belt
- Magnifying glass, Lens – Used to light a fire with the sun. However, not sure I would need to light a fire during the day. Use water in your zip lock bag to magnify the Sun instead
- Paper – good for fire starting and recording your journey, landmarks etc
- Pencil – making a map might be a luxury. Improvise and add paper stuck to the back of your signal mirror
- Torch – Improvise with fire, to move around in the dark. TRY NOT MOVE AROUND IN THE DARK. Only if you absolutely have to, it’s dangerous! If you must include a torch, try and find the type that will maintain your natural night vision. They can be expensive though so it’s best not to move around in the dark!
- Butane Cigarette Lighter – you can easily replace the flint and rope with a lighter. The normal sized lighters available might be a stretch but the half-sized ones will fit better. WARNING, all gas filled lighters can explode under certain conditions and not just in the typical ways you’re thinking:
Ventilation
Don’t forget to provide plenty of ventilation when burning any material, carbon monoxide poisoning is lethal! Ventilation will be covered in future posts. Make sure you have awareness NOW, including around the home and not just camping – it’s a silent killer!
The Final Pack
Your Pocket Survival Kit should be packed as tight as mine by now. However, if you have chosen more personalized options with some of the items, then you may have more spare space than I have. Fill it – you can now slip in some of the other items deemed less worthy than the vitals. Or you could add more ways to gather water/salt to your kit, even fire starters. The more the better and the longer you will give yourself to be rescued successfully. So, poke as much gear as you can into the gaps of your PSK, to make it totally fit for purpose! Survival Fit!
What was left out?
Now, the penalty for such a compact and packed out PSK is that some items don’t fit and you would really like to have them – Bandages and dressings foremost, duct tape and cord are others. Band-Aids and Butterfly strips can be easily slipped into the gaps inside the PSK but not so for the bulky bandages/tapes/cords.
Inclusion of a decent compression bandage might push the overall size of your PSK outside of the comfortable pocket size range. Which is unacceptable – we need to improvise if we want it all in one neat pocket-sized survival kit and we do:
Medical:
Band aids wrapped around the PSK and held in place by elastic bands:

Self-adhesive Compression bandage, can be cut into strips for lashings too

Full bandage wrapped around PSK and held by 2 elastic bands. This provides a nice cushion effect and a fantastic non-slip surface, keeping the PSK firmly in your pocket now. Only wrap the PSK like this prior to setting out on your adventure, as this will ensure the self-adhesive bandage is in top condition.

Apply the same theory with duct tape, you can even do both without compromising the overall pocket size. Elastic bands keep the PSK from slipping out of your pocket in this config and you can even store a spare map under them. Or, have it all and wrap the whole thing in your bandage afterwards.

Double tape

You could also wrap your PSK completely with Paracord instead. Just make it relatively easy to access the inside if you do go this way.
On it Goes
Your PSK building journey doesn’t end here, oh no. This is where you begin the testing and refinement phase and under the controlled conditions of your own property or your favourite campgrounds. This is the time to find out if that fire lighter or drinking straw are worthy to hold their place in your PSK. Remember, it’s your life depending on it!
The other and what I consider to be the main point of this whole blog and PSK building exercise, is to increase our survival fitness. So that we grow confident to go out camping with our children, instead of holed up at home. The upcoming generation will end up with an unnatural fear of nature, unless we adults educate ourselves and grow in confidence. A kit like my PSK can only help to give you that confidence to face the wild and take your children along too!
The benefits of a stay in the great outdoors has more than just a physical impact on the body. The mind greatly appreciates the change up to the normal life you experience day to day. Not so much because of the lack of stress, as there can be plenty of stress living outdoors, it’s just different stress. Which ultimately helps build a new mental resilience and your confidence explodes from there.
You just have to get out there and push yourself to see and don’t forget to take the children!
How can you help?
Read on for more pocket survival kit tips and the next most important sized kit to carry on your adventures with nature. – The 72 Hour Survival Kit
Share tips and skills to benefit everyone on their survival journey. And share the skills that help motivate your family to want to spend time outdoors, now that’s a skill!
Read on for Essential Survival and hope to see you in the wild one day (with your family) Be safe and be a survivor, always.

Become its master
“As an Amazon Associate I earn from qualifying purchases.”