
What Items Should Be in a Bug Out Bag? – Continued

This “How to Make Your Own Bug out Bag” post, follows on from the previous post “What should you pack in a Bug out Bag“. You should read that post first, if not, read on to see how to build the core components of the ultimate Bug out Bag.
Previously, we finished with these four basic areas that you’ll need to allow space for. In this post, we will look at building each of these kits and together they will become the integral parts of your Bug out Bag. To help with packing your BoB later on, try to use soft bags or containers to make these kits.
- 72 hour survival kit – For emergency wilderness survival needs
- Urban survival kit – For Urban survival environments
- Personal space – For personal items such as valuables and other non essential survival items
- First aid kit/Toiletries/Medications – Personal hygiene and medicine as well as a more extensive first aid kit and supplies.
The most important of all of these kits, is the 72 hour kit, as it has the basics for your survival covered. If you have to lighten your load for some reason, then the 72 hour kit is the one to keep and throw the rest. It’s for this reason you need to have a detachable 72 hour kit, when carrying a Bug out Bag. (or BoB for short)
Don’t forget to make a plan for your potential emergencies, plenty of resources available online – https://www.redcross.org.au/prepare
How to Make a Bug out Bag?
Kit #1 – Detachable 72 Hour Survival Kit
For this kit, you’re building a trimmed down 72 hour kit, so it can either attach to the outside or go inside your bug out bag. As a further result, some of the items normally found in a 72 hour kit, will have to be stored separately.
For my BoB, I chose to have the kit attach to the outside, to primarily save on packing space inside.
Size and Weight
This is a kit that’s supposed to be small and portable, while still carrying a decent amount of gear. It also needs to fit in with the Bug out Bag you choose and preferably attach to the outside of it. Overall, the bag can be whatever type you want but it has to be separable from your BoB as a minimum.

A list of the reduced kit contents and in their survival categories:
- Fire/Warmth
- Heat blanket
- Life Bivy
- Safety Matches
- Beanie
- Ferro Rod
- Plasma Lighter
- Small box of tinder wads
- Hunting/Food
- 2 x waterproof dry ration tubes – tea or coffee, powdered soup etc.
- Slingshot
- Fishing Kit
- Knife
- Knife and Spork
- Water
- Water Purification tabs x 20
- Filtered Straw
- Mess Tin
- Rescue/Navigation
- Signal Mirror
- Rescue whistle
- Compass x 2
- Flashlight
- Medical
- 2 x compression Bandages, 1 x Triangular Bandage
- Multiple Wound Clot dressings and gauzes, Band-Aids
- Medicine Container
- Cordage
- 12 Feet of Seat Belt Material
- Paracord (wrapped around knife handle)


Keep This Kit Simple
There is always the temptation, to just want to pack in one more thing, that you think you need. That is how your kit ends up too big and heavy to properly perform its role. Make sure you only pack essential items in this kit and keep it lightweight, max 2kgs is a good guide.
As you can see from the list and photos, that even though it is a reduced kit, the essentials are still covered. You now have a list to build a lightweight and detachable 72 hour kit for your Bug out Bag. And with the essentials for your survival taken care of, you can move on to the next kit to build.
#2 – Urban Survival Kit for a Bug Out Bag

When making your own Bug out Bag, you have the ability to tailor the contents to suit you. Another environment to be considered for your BoB, are the ever growing Urban areas. Again, a simple and small kit added to your BoB should cover your urban survival needs.
It’s not like you would be bugging out in the city but rather away from the crowd. Although, you would also be unlikely to bug out into the middle of nowhere and at least stay closer to civilization. You may even need to make regular forays from your bug out location into the city, to replenish your supplies.
There are many ways you might come across an urban environment and therefore, you will need to deal with urban problems. Unfortunately, most of those urban problems you will be unable to make a kit for. Not without potentially falling foul of the law yourself for carrying weapons, even if for your own survival.
Fortunately, you want to avoid that sort of confrontation and move in and out of urban areas as quickly as possible. Move in, keep a low profile and blend in, do your business and move back out to your bug out site. That’s about as much interaction that you’d want with urban areas and best they are avoided.
A Small Kit for Small Interactions
Out in the wild, you carry tools suited to the environment, such as a Parang or even your knife. So, it makes sense to have a few tools, packed in your BoB, to help deal with urban environments. Some of the urban challenges, will be things like mechanical fixings or locks, barring your way. You may be required to also pry things up or open, to potentially seek refuge from rioters or other criminals.
Keep in mind, that a good multitool can cover a lot of these urban problems and tool kits are usually heavy items. Therefore, keep the tools small and as light as possible but most of all, you need to be realistic about the tools you’re packing. Huge spanners or demolition hammers are just too much of a burden to carry in your pack all the time.

Keep your Bug Out Bag Lightweight and Local
Unless your emergency plan requires you to take a large and heavy tool, you will need to pack only small tools. For instance, 12mm spanners are the max size you can entertain packing in your BoB. Above this size the spanners start to get longer and heavier, to undo the larger sized nuts.
The most common nut size you’re likely to come across, are around the 5-10mm size. Probably an 8mm nut is the most common and it’s usually the 8mm socket that is the only one missing from your socket set! In any case, you will pack the tools that suit your local urban environment and which will have the most use to you.
There are endless versions of this kit that you can make and you need to pack the tools that reflect your skill level. For example, my urban survival kit includes a lock pick set. Which unless you know how to use a particular tool like that, you wouldn’t include it in your kit. So, just make sure you’re not carrying things around that have a low probability of being useful to you.

Urban Survival Kit Contents

The Urban Survival kit for a Bug out Bag will look much different to a stand alone urban kit. This version will need to be very much trimmed down to keep your BoB lightweight. For this kit, you will choose the bag/container first and then fit the tools you want into the bag.
It’s important at this point to keep everything you pack as small as possible. As from now, everything gets packed inside your main bag and space is at a premium. If you want it all to fit, make sure everything is compact in size and useful for your survival.
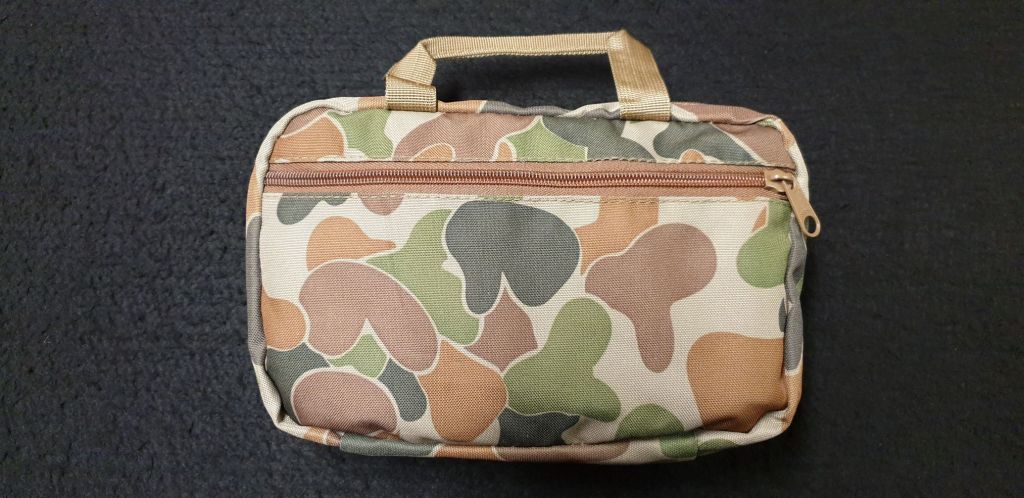
For my Urban survival kit, I chose two bags or cases that I had in my games cupboard. In a previous life they were for a handheld game console called the ‘PSP’ made by Sony. But they also make a great urban survival kit bag now!


A list of contents for the lock pick tool kit:
- Lock pick set
- Torch
- Nail file
- 8mm ratchet open/ring spanner
- Small pry bar/punch
- Cross tool for opening tamper proof water taps
- Selection of security and common screw tips
- Side cutters
- Pliers
- Knife
- Coins

Packing Your Urban Survival Kit
Once you’ve settled on a sensible set of tools for yourself, find a small pouch similar to mine to pack them. There will be a future post on Urban survival kits but it is really up you to decide the best tools for your situation.


Other items that you need, you can add them to the remaining storage space of the main kit bag. For example, you are likely to have phone signal in an urban area. Therefore, a way to recharge the phone battery or any other device makes sense to have.

Some items will work for you in both the urban and wilderness environments, try to pack items with this versatility. These next three items will bring better vision of sketchy terrain and the streets ahead.


Add these items to the list for the urban kit:
- Spotting scope
- 2 x small knives
- 1 x small serrated blade
- Another $40 of coins in a roll
- Power bank
- Spring loaded punch
- Hex key set
- Space pen
- Butane lighter
- 2 x tracking devices
- Universal wrench

That’s about as heavy as you want this kit to be, however, a max of 2kgs will probably be acceptable. As there is a huge local variance with urban areas and cultures, even law enforcement, this kit will look different for everyone.
Some items in this kit will be seen as weapons and in other places maybe not. So, make your kit local and fit for purpose and matching your skill levels in its use. Keeping the kit small, lightweight, local and useful, are the only things to focus on when building this kit.
Personal Space in Your Bug Out Bag
Not only is it good general practice, to pack small and light gear, it’ll also give you the maximum personal space possible. You can use this space to pack extra clothing, blankets, footwear, food and other items. You may also be bugging out with your entire life savings with you!
#3 – Valuables Survival kit
Normally, your valuables survival kit is stored near your valuables, in a secure location around your home. If the time comes and you need to go, you can grab the kit and quickly fill it with your riches. With your pre planning, all your valuables will fit in the kit and your Bug out Bag will have space for the valuables kit allocated.
Your valuables kit will obviously be tailored to suit your choice of valuables. For example, all of your wealth might be in the form of cards and cash or jewels and gold. Whatever form it is in, you need to find the appropriate container, bag or pouch that suits your needs.
Personal Choices

For this Bug out Bag version, I chose a small valuables pouch that can be worn discreetly on the body. The container that you choose will suit your valuables, whatever they may be. However, the size and weight of your valuables kit needs to work with the rest of your BoB gear.
Also, to help with packing, try to contain your valuables in a soft bag, rather than a rigid lock box. If you do need a steel box, for all your gold bars, just make sure that the box can be used in a survival situation. For example, to be able to use the steel box to boil some water to survive another few hours, toss the gold aside.
People might consider other items as being valuable, like a spare pair of shoes or even their cell phone. What makes building your own Bug out Bag worthwhile, is that you can decide what is valuable and how much space you need for it. Whereas, some ready made BoB’s are jammed packed full of survival gear and leave little room for personal needs.

I added some alternative footwear for wetland areas, which I expect to encounter along my escape route. Also some protective eyewear will come in handy for me and I have the space for it. There is plenty of room for rations or even food, such as a dozen cans of Tuna if you like.
Food is a Personal Thing
While you’re building your Bug out Bag, some consideration needs to be taken for food or rations. Unless, of course food is abundant around your bug out location, that you can either purchase or hunt for. Otherwise, you’re hauling your own food supplies in your BoB, sacrificing personal packing space.
This example of a Bug out Bag, is for a wilderness/urban environment and is packed with gear for such. Which suggests that you would use this bag to bug out in the woods but still have access to urban areas for supplies. So, in this Bug out Bag version, there is not much need for space to pack food or rations.
If you were to pack food, try to select long lasting, single serve and securely packaged products. For my bag, I would choose canned Tuna, not only because I like Tuna but it meets all the other criteria. 12 x 100g cans of Tuna, duct taped into rolls of 6 cans each, fits perfectly at the base of my BoB.
Again, Planning is Important
When heading off camping with your family, a tremendous amount of planning for water and food supply is undertaken. So, unless your plan to bug out includes sitting cold and hungry in the woods, then planning for food is paramount.
Bugging out to escape any threat is advisable. However, without the proper provisions for food and water, you’ll be starved back out into the open in no time. The most preferred option, is that you planned your bug out location correctly. For example, your location of choice, has access to abundant fresh water and also to a reliable food supply.
Which of course means you don’t have to carry it with you or be forced to abandon your location to find it. Clearly, you only have a few options here; you carry, purchase or find your essential water and food.
Food and Water are Always Important
Therefore, if you do intend to carry provisions, be prepared for the extra weight and loss of packing space. Potentially, even having to remove some of your pre made kits to replace with food. Although, if your plan includes purchasing food, you may need to expand your Urban kit, for more trips into town.
If your intent is to hunt and forage for your food, then you will need to carry the tools for that. An example of that could be the AR 7 survival rifle, covered in a previous post, or any other compact hunting weapon of choice. If you’re unable to carry a firearm in your BoB, my next choice would be a slingshot or Bow.
Link below to AR 7 post and video:
Choose Your Weapon to Travel Light
Whatever your weapon of choice, make sure it’s collapsible or compact enough to attach to the outside of your BoB. The AR 7 can be lashed to the bag, as can a slingshot, Bow or Crossbow and any ammo, store in an external pouch. It’s for this reason, that you choose a bag with ample loops and attachment options on the external.
Lastly, I used personal space for spare clothing, radio’s, GPS, weather station, a Gameboy and another power bank. I have a little bit of personal space left over, which I could fill with spare socks and the valuables pouch. Although, have some consideration for boredom and how you will keep yourself occupied while bugging out. I put in a Gameboy console and you can even throw in some playing cards, whatever keeps you entertained.


#4 – First Aid and Toiletries Kit
This kit has more purpose than just holding your toothpaste, it is your daily go to kit. Whether it’s for first aid or toiletries, this kit is your main stash and the one to be used every day. This will prevent you from raiding your 72 hour kit or worse, raiding your pocket survival kit.
It is important that those two kits remained fully stocked, for use in an emergency situation only. You will carry the #4 kit to primarily prevent you from needing to do that and for organized, easy access to everyday items. When choosing your bag for this kit, keep in mind the frequent daily access you will require from this bag.
Easy Access
Basically, you want a bag that can be opened up or laid out, to gain better access to the contents. With that said, all the contents need to remain in place when you do open the bag up. I found a cheap bag at an army surplus outlet that works perfectly, try to look for these qualities with your version.


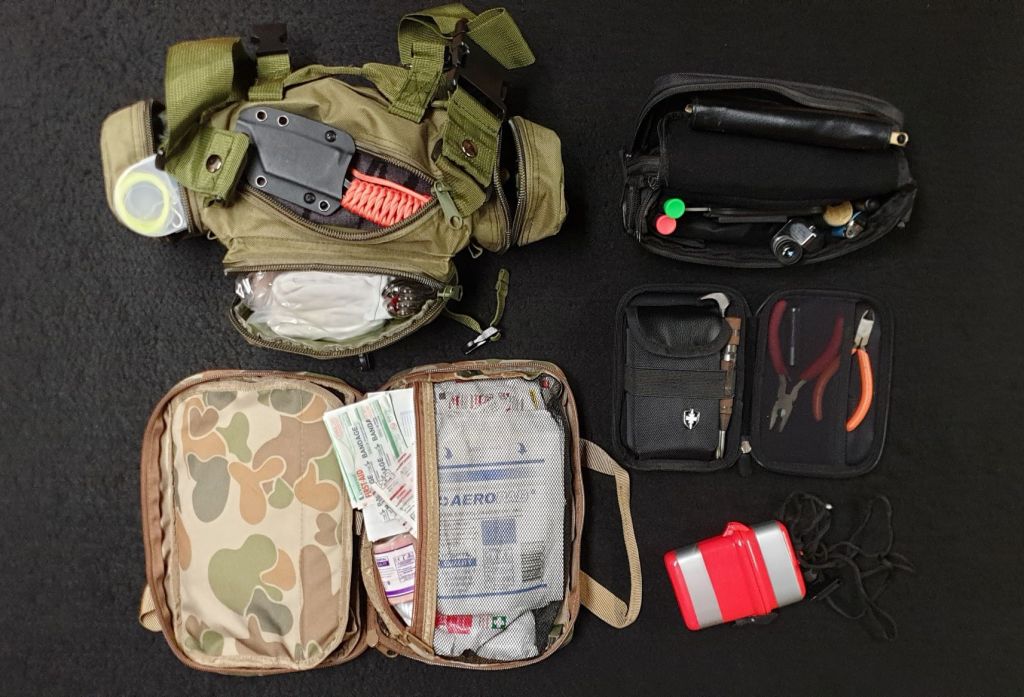

Not only will this kit hold common Band Aids and more advanced dressings but also personal medical and hygiene items. That could be things like Ventolin or high blood pressure tablets or even dental floss and mouthwash. So, basically make a first aid kit and add your personal needs to it and don’t forget toilet paper!
This kit does the job of preventing you from consuming vital supplies from your other survival kits. As well as, providing easy access to your most used hygiene items and emergency first aid gear. I recommend that you build one more kit and for similar reasons as this kit is built.
#5 – Fire Starting Kit
This kit is pretty self explanatory, as it holds ready to go fire lighting tools, such as lighters and tinder. This will again stop you from using the provisions in your survival kits, when you’re just around the campsite. Both the #4 and #5 kit should be packed in your BoB, so that they’re easily and frequently accessible.


Putting it All Together
Finally, out of these 5 kits, only #2 and #3 kits are optional or interchangeable for other kits. For instance, you may need a cold weather kit, instead of an urban kit or valuables kit. The #1, #4 and #5 kits, are good for all environments and therefore are the mainstays of your Bug out Bag.
It doesn’t matter what you replace the optional kits with or not replace at all, as long as you have the other 3 kits. I will post in the future on some ideas for these optional kits for your Bug out Bag.
We now have a list of the core items that make up a Bug out Bag and sorted them into organized kits. In the next post, I will show you how your Bug out Bag gets built and the bag I chose for mine. Also, by adding some versatility I will increase the survivability of the Bug out Bag itself.
I will put all of the Bug out Bag’s contents into a spreadsheet and find out the essential score for my BoB. We can then use that score to compare mine to other pre made BoB’s available online. So, I look forward to the challengers taking on my Bug out Bag build, in future posts.
Thanks for reading and keep reading the next post – “How to Build Your Own Bug Out Bag”